So here it is at last, the under bust pattern tutorial! At one moment in the making of this tutorial my portable hard drive crashed and all the data for this tutorial was lost with it, I was almost done with it all it was just a matter of putting the text and the pictures together, I had a pdf version of it, on Swedish which was in one way a good thing but it was not totally finished and had a few things that needed to be fixed in the Illustrator made diagrams that were lost.
It kind of killed me to loose all my data, so I kind of gave up on it all but yesterday I had some luck with the hard drive and managed to save the files needed for this tutorial. I was beyond thrilled!
So I present to you all the under bust corset pattern tutorial!

The biggest prejudices about corsets are that they are really uncomfortable to wear and that one cannot breath properly in them, this of course is all wrong. Sure there is a special feeling to wear a corset, you body is heald together in another way than most people are used to but there are no problem breathing, a corset that fits YOU well will ONLY reduce your measurements were it should, and that is the waistline. The problem with of the rack corsets are that they not necessarily fit you body type, you might have smaller hips then what the corset is made for and therefore you need to lace it more over the hips. This makes you lace your chest more tightly to be able to get the lacing as straight as it should be and that will make you feel like you cannot breathe properly. It says itself that to lace your chest tightly it is not healthy and can lead to problems. But as I said, a corset should only be reducing your waist measurement; a place where most of us have some squishy material anyway.
A lot of people fear pattern drafting, it seems hard, like there is a lot of math involved, but really it is not hard at all. All that is required is some logical thinking. There is no complicated math, no complicated techniques. It is all about drawing lines on a paper based on measurements taken from you own body.
What this text describes is how you, from measurements taken from your body makes a personal under bust corset pattern. What you will need is paper, pen, ruler and tape measure. This tutorial is based on how I make my patterns, after my personal pattern layout which is a corset in 12 pieces without side seam that will reduce more in the side and in the back. This gives a corset that is flat fronted and can if you want to have very dramatic curve in the without having any problems. Not having a side seam also means that you will not have any boning in the middle of the side.

But this tutorial is written so that you yourself can decide where to put our seams and how many pieces you want to use. How many pieces is not only a question about taste but also how large a person the corset is for. A very petit person does not require as many pattern pieces as someone three times as large.
In this tutorial we will use the measurements of a girl in my class who was kind enough to be my guinea pig, but remember that it is only so that we will have some numbers to relate to, where her measurements are in this tutorial you will of course fill in your own.
We will start with taking measurements; put a plain cotton string in your waist after you taking that measurement, that way the other measurements will be easy to take.

The measurements needed:
| Under bust: | 28,3 inches | (72cm) |
| Waist: | 25,2inches | (64cm) |
| Hip: | 31,5 inches | (80cm) |
(or were you want the bottom part of the corset to be)
| Waist to under bust: | 3,9 inches | (10cm) |
| Waist to hip: | 6,3 inches | (16cm) |
| Raise on the hip | 1,2 inches | (3cm) |
(If you want a corset that is totally straight in the bottom this measurement is not needed but we want the corset to go up on the hip)
| Length of corset in the front: | 11,2 inches | (28,5cm) |
(this measurement is waist to under bust + waist to hip + what we want the corset to go up a bit in the front), 1 inch (2,5 cm))
| Reduction: | 3,9 inches | (10cm) |
(The reduction is what the corset reduces on the waist measurement. Standard is to reduce 10 cm, but if you have a fuller figure you are often able to reduce more than if you are petit. If you are not used to corsets 10 cm is a good thing to start with)
| Opening in back: | 2,4 inches | (6cm) |
How much you want is a matter of taste, it all depends on how much you want to see under the lacing. Some people want their corsets to be laces all closed and some wants much of the skin to show.
When you are drafting your pattern you will only draft one half, so there are some measurements that you will need to split in half.
| ½ under bust: | 14,2 inches | (36cm) |
| ½ waist | 12,6 inches | (32cm) |
| ½ hip | 15,7 inches | (40cm) |
| ½ opening in back | 1,2 inches | (3cm) |
Now it is time to actually start the drafting

1.
Draw a center front line.

2.
Draw a waist line that is about in the middle of the center front line.

3.
Draw a hip line, according to my measurements 6,3 inches (16cm) down from the waist line.

4.
Draw a under bust line, according to my measurements 3,9 inches (10cm) up from the waist line.

5.
Put out half a hip according to my measurements 15,7 inches (40 cm) both on the under bust line and on the hip line and connect them so that you now have a rectangle.

6.
Mark out were the side is, according to my measurements it is half of 15,7 inches (40 cm), in other words 7,9 inches (20cm).

7.
Mark out the opening in the back, according to my measurements 1,2 inches (3cm)
8.
Now it is time to decide on how many pieces you want your corset to have, mine will have 12 pieces. Because we only draft half a corset that makes six pieces, no seam in the side but a piece instead, three pieces in front and two in the back. If I would have made a corset that laced fully shut I would have had three pieces in the back as well.

9.
As you often want a flat tummy when you wear a corset, my corset will not reduce anything against the canter front piece. You place the seams entirely were you want them but remember that you might want to accommodate a bust in front and that you want to have space for your grommets with boning around in the back, so don’t make those pieces to narrow.
My first seam goes 1 inch (2,5 cm) into the bottom and 2,4 inches (6 cm) into the top, and as I said I will not reduce anything against this seam as I wish to have a totally flat front.

10.
After that I draft my side panel, it is 1,2 inches (3 cm) in the waist and 2,4 inches (6 cm) in the top and bottom. These numbers are all up to what you think looks good. Draft half on each side of the side line, in other words 1,2 inches (3 cm) of each side of the side line in the top and bottom and 0,6 inches (1,5 cm) of each side of the side line in the waist.
Connect with straight lines.
11.
The reduction you make with a corset is 3,9inches (10 cm) as a standard, but as I said, if you have a fuller figure you can probably reduce more due to extra squishy material.
These 3,9 inches (10 cm) can either be taken out evenly on all the pattern pieces, but I think that it gives the best shape if you take most in the sides a bit in the back and not much at all in the front. This gives a curvy nice shape seen from the front and a straight front and flat tummy seen from the side.
Since we are working with a block that is based on your hip measurement the reduction will be like this, hang on now because here comes the most “complicated” math part in the entire tutorial!
Hip 31,5 inches (80 cm) – waist 25,2 inches (64 cm) + reduction 3,9 inches (10 cm) = 10,2 inches (26 cm)
Divide this in two since we are only working with half a pattern. That gives you the number 5,1 inches (13 cm)
The measurement that you will remove from your pattern in the waist is therefore 5,1 inches (13 cm)
I will do that this way
1,6 inches (4 cm) on each side of the side piece
1,2 inches (3 cm) in the back
0,8 inches (2 cm) in the front

12.
Mark out 1,6 inches (4 cm) on the waistline on each side of the side panel and connect them with straight lines were the side panels lines reaches the under bust line.

13.
Connect with the side panel’s bottom edge with a nice curve; this curve gives the shape of the hips. It can take some practice to make them look exactly alike and nice in the shape, I get some help by using a tailor’s ruler with a curve on.

14.
Now you are going to draft the other two pieces on the front of the corset, what you are drafting is the last seam dividing these to pieces. I choose to divide the space between the other two seams in half to get two even pieces. Here the distance was 3,9 inches (10 cm), so I put a mark on the middle; at 2,5 inches (5 cm)

15.
Then I mark out the 0,8 inches (2 cm) I am going to reduce in this seam. In other words put 0,4 inches (1 cm) on each side of the mark you just did.

16.
Draw a perpendicular line from the waist to the hip line and under bust line.

17.
Connect the marks from waist to hip line and under bust line with straight lines.

18.
Because I want two panels on the back to so I do the same thing here as I did on the front. I measure the distance between the seam at the side panel and the line of the back opening and divide that measurement; which is here 4,5 inches (11,5 cm) in two.
In the same way as of the front pieces I put a mark in the middle and put out my reduction 1,2 inches (3 cm), in other words 0,6 inches (1,5 cm) on each side of the mark you just did.

19.
Even here you draw a perpendicular line from waist and to hip line and under bust line and then connect the marks from waist to under bust line and from waist to hip line with straight lines.

20.
Control measure that the waist measurement on the pattern is correct. The measurement you should have is your waist measurement – reduction – opening in back, divided in two. According to my measurements 25,2 inches (64 cm) – 3,9 inches (10cm) – 2,4 inches (6 cm) /2 = 9,4 inches (24 cm)
21.
One could think that now this whole pattern drafting ordeal is finished, but that is not really the case, not yet but we are getting there I promise.
Because we started out using the hip measurement when we drafted the block in the beginning, the measurement that is now on the under bust line is not correct. (if you have the same measurement of your under bust as your hip you can ignore the steps that is about this and go on to the ones after this).
The hip measurement is 31,5 inches (80 cm) when the under bust measurement is 28,3 inches (72 cm), this makes it to big in the top at the moment, to see how much you need to remove we will make some calculations.
Hip 31,5 inches (80 cm) – opening in back 2,4 inches (6 cm) = 29,1 inches (74 cm)
Under bust 28,3 inches (72 cm) – opening in back 2,4 inches (6 cm) = 26 inches (66 cm)
29,1 inches (74 cm) – 26 inches (66 cm) = 3,1 inches (8 cm)
3,1 inches (8 cm) is the difference between the under bust measurement and the hip measurement – the opening in the back. This we need to divide in two since we are only drafting half a corset. 3,1 inches (8 cm) /2 = 1,6 inches (4 cm)
You have to remove 1,6 inches (4 cm) from the width of the top of your pattern, this we do evenly over the whole pattern and as we have 4 seams that we have reduced in we will take out 0,4 inches (1 cm) from every seam, evenly on both parts of the pattern pieces.

22.
A little exception from what I just said is that we do not remove anything from the side piece. There we remove the 0,4 inches (1 cm) from the pieces connected with it in stead.
Put out 0,4 inches (1cm) on the panels, draw new lines and erase the old.

23.
In the seams in front and back you put out 0,2 inches on each side of the middle line (0,4 inches (1 cm) together), draw new lines and erase the old.

24.
It is time to control the measurement of your under bust line. The measurement of your pattern pieces together should be under bust measurement – opening in back divided in two. According to my measurements 28,3 inches (72 cm) – 2,4 inches (6 cm)/2 = 13 inches (33 cm)

25.
Now it is time to draw the shape of the bottom of your corset and also the top.
We decided from the beginning that it should dip down in the front, or the same thing it goes up over the hip. 1,2 inches (3 cm) to be exact, mark out 1,2 inches (3 cm) up on the middle line on the side piece.

26.
Draw a perpendicular line straight over the side piece.

27.
Connect the raise on the hip with the front and the back pieces in a nice shape.

28.
We also wanted it to go up a bit in the front. We raise the center front line with 1 inch (2,5 cm). Then you draw your desired shape, the shape can be made in a thousand different ways, I like it slightly rounded.

29.
On this corset we also wanted a “high back”, that is also a matter of taste but it helps preventing bulging in the back, a muffin top as it is also called.
We chose to have it 7,9 inches (20 cm) up from the waistlines, elongate your middle back line (the opening in back line to be exactly) and draw a perpendicular line from that.

30.
Then form your “high back”, remember the side piece, it can be strenuous if your “high back” started to early, it might chafe.

31.
The seam of your back pieces follows up in your “high back”, extend your middle line of the seam that you made before and continue your seams until they meet naturally, after that what becomes your seams is the middle line.
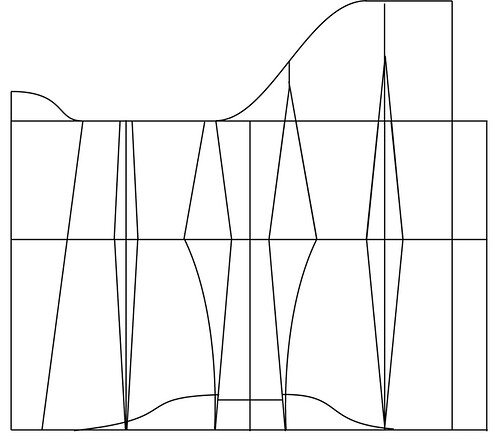
32.
Now measure your seams so that they correspond, be extra careful at the panels connected with the side panel, there one line is straight and one is curved. You almost always need to make the straight line longer to accommodate for the curve. I had to make my lines 0,2 inch (4mm) longer, it might look odd on the paper but a curved line is longer than a straight so it works out in the end.

33.
Even out the sharp angles that are in the waist.

34.
Number your pattern pieces.

35.
I also put out letters in the bottom corners, this makes it really simple what parts belongs together.

36.
Cut your pieces out, you are now finished with your pattern!
Some words along the way
We are all difference and out bodies act different, this makes it harder when It comes to pattern drafting a piece with such a tight fit, nothing is 100% secure. Some can lace in more and some can lace in less. This does that I cannot promise you that the pattern you get from this tutorial will fit just perfect right away, but this is the way that I draft my patterns. Before completing this tutorial I made a corset out of the pattern I got from this tutorial for Sofia whose measurements we have used all along this tutorial, without making mock up, ant it fitted beautifully
If you have a really expensive fabric It can be smart to make a mock up before cutting in it. When it comes to corset sewing you cannot really tell if the corset fits and works before it is almost done. A corset mockup should be sewn in to layers of non stretch fabric (twill works fine, coutil is the best and when working with coutil you only need one layer for the mock up) and all the boning and grommets need to be put in to get a accurate fit on the mock up and to be able to see the shape.
Good luck!


This is really fantastic; you’re an excellent designer. Thank you so much for sharing this!!
Oooh, thank you for sharing! This is a super helpful tutorial (that I may use soon!)
Lovely tutorial, very useful!
I understand everything, except step 11, I’m afraid. I don’t understand why you need to substract your natural waist measurements from your hip measurements. To get your waistline for your corset, can’t you just take your natural waist measurements minus your desired reduction? This might be a silly question, I’m sorry
Eleni
It is only because we are working with a block that is based on the hip measurement you need to do a bit of counting to be able to see how much you need to take away from the waist. In the end what matters is that the measurement of the waist is just what you says, your waist measurement – reduction and such things.
It is so that one can in a simple way see how much one need to have in the “spaces” that you cut away in the end.
I hope that it clears it up a bit, English is not my native language and sometimes it is hard to translate my thoughts in a way that makes sense ;)
Hej! Jag hittade din underbara blogg via stenebys hemsida.
Jag ska nämligen börja på läder, skin och päls i höst.
Jag undrar bara, vilken sorts mönsterkonstruktion använde ni er av? Gjorde ni allt ifrån grunden som här i din guide eller utgick ni ifrån grundmönstren i mönsterkonstruktionsboken? (mins ej författaren haha)Du är vekligen super duktig sluta aldrig skapa! =)
Hello!
Georgeous tutorial! I have searched an ages to find something sophisticated and valuable like this and I find it just now – after I already made my first self drafted pattern and must say, that my intuitive technique was quite very similar to yours… ;)
Hello ,
You ‘ve done a great job , thank you for the explanation but only one question if I don’t want openign in the back , I don’t have to substract hte 6 cm and it will be all closed right ?
Thank you Brigitte
Yes that is correct :)
Hi again,
I so exixted for making this underbust ,how about seam allowances on the last piece 6 do I have to leave for the grommets and bonings ?
Thanks again for your tuto!
You should not put on any extra seam allowance for the boning or the grommets, they are supposed to fit “inside” of the pattern piece, like this http://i9.photobucket.com/albums/a68/Cattislearningtofly/corset35.jpg
So you only add the seam allowance that you use to sew the pieces together in the back, depending on how you chose to sew your corset.
Thank you Katafalk !!!
Excellent pattern, just what I was looking for. Do you have a tutorial on the “boning” or use of and sewing of stays?
thanks!!
This is the best tutorial i have found for drafting a corset, thankyou so much for your kind efforts to share your skills. It is definately appreciated!!
Hejsan. Bara en fråga. Om jag vill göra en korsett fast en som går över bysten, kan jag bara lägga till de måtten också och göra delarna längre fast med samma princip? Om du förstår hur jag menar hehe… Tack för en bra turorial.
Jo det kan du, mönsterkonstruktion handlar ju egentligen bara om att få måtten på papperet fungera på kroppen. Det som kan vara värt att tänka på är att en korsett som går upp över bysten oftast inte kan sitta lika tight i underbysten som en ub gör för att kurvan mellan bysten och underbysten blir så extrem att det är svårt att få den delen att stödjas upp av sig själv då stålen oftast måste vara spiralstål som inte klarar av att stödja en byst som samma sätt som krinolinstålen gör. Man måste även tänka på att bröst är oberäkneliga och kan behöva mer plats i korsett än vad de behöver utan korsett pga av push up effektenman får.
You´re so sweet for sharing this! Thank you so much!
tack för att du delar med dig och gör en begriplig konstruktions tutorial.
jag skall försöka knåpa till en underbyst korsett.
jag känner mig ganska peppad iaf.
wish me luck!
Thanks so much for sharing this! I admire all of your work. Is there a possibility that you will make a tutorial for drafting overbust corset patterns sometime? I would really appreciate if you did.
First of all congrats on the tutorial..
Finally I found one detailed and with pics..
I just have one question…
You finished the patterns, don’t you need to add seam allowances to the pieces so I can put the bonning and such?
Reply to Poly – See reply #10.
To Katafalk – Beautiful pattern! However, I’m a little confused about one thing.
In step 3, you draw the hip line 13 cm below the waist line. Your model’s waist-to-hip measurement was 16 cm, and her raise was 3 cm, so I presume that that is how you got the number for step 3. However, in step 25 you remove those 3 cm again. If step 3 is correct, I would think you would actually want to add 3 cm to the center front and center back instead of removing them from the sides. Is there something I’m not understanding, or should step 3 actually be 16 cm?
*ahem* I’m sorry, I wasn’t clear: “so I presume that you got the 13 cm for step 3 by subtracting the raise from the waist-to-hip measurement”
Hello Polly
Yes you need to add seam allowance, how much depends on what technique you are using when you are assembling the corset. I never add my seam allowance on the pattern but directly on the fabric in stead. That way I can always choose what kind on seam allowance fits just that project and method of assembly I want to use that time.
/Cathrin
Hello Deborah
You are totally right, that does no make sense at all.
Step 3 should as you say be 16 cm. Thank you for pointing this out! :)
/Cathrin
gracias por compartir estas enseñanzas tan lindas y tan importantes por que la verdad nos alluda demaciado mil gracias rosita de barranquilla colombia
Hello there! can you write this on swedish to? I’m not so good at english so it would be nice to understand this one so I can do a corset pattern soon. Thanx!
/Vendela
I have found your tutorial extremely helpful and anticipate making my own corsets soon. One style I really want to accomplish is a very high back underbust with straps. I’d like the back to go up a few inches below the neck, but I haven’t been able to find lacing boning that long. If I were to set up two strips, one above the other, wouldn’t it cause issues with comfort? I expect I will need to cut my own boning for this piece because the back will be so long and I could just use the fabric to create the lacing panels, but because this corset will be so large, I think it might be sturdier to use boning with lacing holes in it already. Do you have any suggestions? Thanks so much for this tutorial! I’ve searched through so many and found yours to be the easiest to understand.
thank you very much for this knowledge. I will be using it to dress some of my fire troupe for a big show we are doing in February.
I found this tutorial to be very easy to follow, understand and I have found the results to be awesome :)
thanks again, I really appreciate it, as does my troupe
otroligt bra tutorial! blev skitpepp på att testa göra mönster efter denna metod! hur gör du när du gör en överbyst korsett? jag får aldrig till bröstdelen när jag försöker rita…
Tack för att du delar med dej av hur du gör!
I love this tutorial. It took a couple tries to get right, but the current mockup fits beautifully and is very comfortable.
This is just exellent, but I wonder how you sew it all together. I never sewed a corset before.
if you wanted to not have an underbust but a type of corset ,that you made that was black, that covered the whole bust.. what do you do to make it cover the whole bust? can you please make a tutorial???!!
Hi, I have made my first underbust thanks to your corset pattern tutorial! It fit perfectly!!! Do you think that it works also for an overbust corset?
This is completely amazing. I am *so* desperately looking forward to the end of finals so that I can get home and start sewing!!
I have a couple of questions for you about this tutorial however.. First, how many pieces of boning did you use, and what kind? This will be my first attempt at corset-making, but I do want to do steel bones, I think… Second, how would I alter the front panels to include a busk?
thank you so much for this! i have to make a costume for my theater final and im making a corset for my character out of duct tape. i had a kind of idea of how to make it but now that i have this pattern it makes things so much easier! thanks a bundle
I made a steel boned corset from this tutorial last week and it came out really lovely, thankyou for the lesson! :)
I will shortly attempt to make a corset for the first time, and drew the pattern using this tutorial. So excited to see how it turns out! Been looking for a good tutorial for drawing a pattern as my figure is a bit oddly shaped and while store-bought corsets never fit anyone properly, they sure don’t fit me! :)
okay.. this is so cool!
I found a tutorial like this, but this one is waaay better.
I just have a few questions,
I want to make a corset, which will reduce my waist by 4-10 cm, like a good corset does. can I use this pattern?
then, can I mix spiral and flat boning for this?
and… last of all: can I make a overbust corset with a little adustings? how? I read your other tutorial, and I think I can figure a bit out, but I think if you would explain it would be a lot better!
I hope you respond soon!
You are awesome! I spent 2 days trying to figure out how to make a corset pattern. I used other tutorials and failed miserably. I just taped my paper pieces together, and I actually did it. I need to make a few tweaks, but IT’S A CORSET! Thanks!!!!
For the last commenter, look here: http://www.kimberleypope.com/how_to_make_a_corset/Pattern_draught.html
I think that’s what you want
28. Sandra: När jag gör en överbyst korsett så gör jag på samma sätt som när jag gör en ub, bara det att man får lägga till en bystlinje och sedan ta ett bystmått och behandla det på samma sätt som du gör med tex höftmåttet. För formen i överkant är det bara att lägga till uppåt så mycket som du önskar och sedan rita in formen du vill ha. Mät från midjan och upp till bystlinjen som är där du är som störst runt om bysten och lägg till det måttet på din mönsterkonstruktion.
Men det är mycket trixigare att göra en överbystkorsett, bröst är oberäkneliga och lite jobbiga ibland så det kräva fler toiler(provkorsetter)
33. Silvia: Yes, just add a bust line to your pattern and take a measurement of your bust and then it is just to do as you do with the rest of the corset. Measure from waist to the fullest piont of our breasts and then you know where to put your bust line to your construction.
fantastic you are amassing!
Wow! Thank you so much! I’ve already made my pattern. All I have to do is to buy some fabric and try if it works :) You explained everything so clearly that drawing a pattern was quite easy.
Très clair et très didactique,merci Katafalk
Hi,
I’m brand new to this so please forgive my potential ignorance… I really, really love your underbust corset design and I was wondering if you would go over the sewing/cloth/metal bits of the creation of the corset. A.K.A. the space of knowing the pattern to having a real, professional corset. I really like your teaching style and I was hoping you could help because you seem to have a good hold on what you are doing. Please reply! Thanks!
Parabéns, vc só não colocou a altura e largura.
O seu tamanho é P, M ou G?
Envia pra mim por email.
Obg…
Thank you for a really good tutorial! I always wanted to have a corset but don’t like the ones I found in shops. I wanted a simple corset to use for its original purpose and to wear underneath my cloths. I don’t like these fashion corsets and all these things so I used your tutorial to make one myself. Thank you very much as it helped me get exactly what I wanted.
oi eu queria em portugues por favor eu amo muito isso e o meu sonho. beijao
Lovely link party.
I wonder if this would work for a 24 boned corset…
I have one question: is it necessary to insert whalebones in corset?
@ theukblog2:
No, you do not have to insert whalebones in to a corset. If I remember correctly, whalebone is both really hard to come by and possibly illegal to buy (not sure of this). But I recommend to bone the corset with either steel boning or there is synthetic whalebone that you can use. It is actually plastic and what you use is mostly a matter of taste.
@Beth: I have a tutorial on the sewing part, check it out at https://katafalk.wordpress.com/2009/05/03/how-i-sew-corsets
Thank you very much for the sewing tuto !
Fantastisk beskrivning! Tack så mycket för all hjälp.
That’s really fantastic!! It helped me so much. I did my first corset and it’s well-fitting and comfortable.
I have been interested in corset making for quite sometime. I am an experienced sewer and have worked with patterens for a while usuauly along side my sewing mentor. My sewing mentor is now 92 years old and has an acute case of CRS (Can’t Remember Sh__t) so doing paterns is now futile. i found this site by chance and I very much like it.
I ordered a book on corset making which should arrive on the 24th of March, my birthday what a gift and I can not wait to get started. My main concern is my front which is quite full, let’s see what happens as I expect to make a few for myself.
Thanks for you information I’ll stay tuned and keep you posted or hollar for help.
Kind regarsd, Larry D. aka Dr. Doodle
excelent tutorial, would it happen to be avaliable in PDF format?
Thank you very much for your tutorial. I have made two corsets and they fit very well. I have found it was rather easy. As a male corset lover, I have been obliged to adapt the pattern for my male shape and it has been working very well! I recommmend this wonderful tutorial to every beginner corsetier… It is very astonishing! Many thanks!
I love this tutorial, but when I tried to share it with a friend today, it looked like it had been taken down, and all that was left was the comments. Is this a technical issue on my end, or did something get messed up?
Thanx such a great tutorial.. I will try this.
Very informative!
Thank you so much! I am 6’3″ and 170lbs witb a bad back. I met a corset that came close to fitting me once. Ever since then i have always wanted one that fit me which didn’t cost hundreds of dollers for my size. Now i can put some of that scrap fabric to use for this project!
I want the corset to extend upwards across my bust….Would I just lengthen the top part of the pattern?
Yes, just lengthen and check so that your bust measure fits. If not, make the pattern larger, but mainly in the front pieces, as there is where you need it most.
Fantastic tutorial, I just have one question. How would you add a modesty panel to it? i want to make a corset but I’m worried about the skin on my back creasing when I lace it.
Giselle:
For a how to on modesty panel, check out http://sidneyeileen.com/tutorials/sewing/corset-making/lacing-panel
What do you mean by “raise”. I’ve never seen this term used before.
Never mind… lol. After reading the instructions entirely through it makes sense now. Ty for a great article. :)
I have read all of the questions above, and I have a few more questions re: adjusting for an overbust corset.
Do I measure in a straight line from waist to breast, or do I keep the measuring tape against my skin and follow the curve of the breast?
Also – does this measurement result in a “demi” corset (is that what it’s called? the one that just covers the nipples), or is it a full-coverarage measurement?
Lastly, any suggestions for a sweetheart neckline?
Thank you!!!
Thank you so much for your tutorial. It was very easy to make a corset with your advice :)
This tutorial is great, I love it! Because of my small hips I have a hard time wearing corsets in a pretty way. Now I can finally make one that fits me perfectly. Thank you so much!
How much fabric do you need to make a corset?
well it depends on how many layers and size. to give you an idea i am a size 8 and i use 1-2yrds for each layer of fabric. my beginner corset has fashion, coutil, flannel, thin cotton twill fabric as my layers. so in all i probably used 8 yrds total of various fabric types. the big thing i found out is to have a 1000yrd spool per corset of thread, man they chew through thread…. in the old corset days they used one layer of coutil and the ribs on the inside with a chemise as a barrier and no padding but back then they were some pretty tough gals.
as Jon Mire said, it is all up to the size of the corset and how many layers you use.
Personally I have two or three layers in my corset depending on the technique I use in assembly.
One or two layers of coutil and one layer of fashion fabric, I don’t line my corsets as I always wear them over my clothing.
My bust/hip measurement is around 115 cm and I can just fit my pieces on the width of the fabric so then I use just the height of the corset, getting away with half a yard of fabric for each layer for a overbust.
And yes you use a lot of thread, the amount is also based on how many pieces and how much top stitching you do, but I use somewhere between 200-400 meters of thread in one corset.
Yes measure in a straight line from waist to breast, measuring against your body gives you a to long front since the corset usually pushes up your breasts.
This measurement gives you a corset that goes up to your bust point, a half bust corset. To make it longer you just add above this but remember that after the bust point your measurement becomes smaller again as the bust point is the widest point of your bust so you need to curve in your pieces a bit to make them follow your bust.
My advice for the neckline is to make it higher then you think and then draw the line on yourself when trying it on. It can be hard to see the lines on flat paper. I always do the neck and hip line just before putting the boning in, I like the visual way.
it was very helpful, thank you for posting
perfect detailed instructions. thank you.
I’m a chainmail crafter and one of my long time projects has been to develop a workable design for a 100% chain woven corset. and this give me a good pattern to go off of for the prototype phase.
I’m very confused about the reduction step. I did: 78.7cm(hip) – 73.7(waist)+ 10cm(reduction) which left me with 15cm total reduction. However, my waist which is 73.7-15cm(reduction) = 58.7 which is a 6inch reduction rather than a 3.9… :L I know I’ve done something wrong but not quite sure what…
Theodora:
You have done nothing wrong. The 15 cm is not the reduction that will be at the waist. It is what must be taken out along the whole pattern block since we are working with the hip measurement as the base measurement.
The 15 cm is what you put in the “gaps” between the pattern pieces. To make the pattern pieces the right size. When you have “reduced” the 15 cm, you go on to step 20, where you can see that you measure the pattern pieces to make sure that you have the proper waist measurement with the right reduction.
Does that make sense? :)
hi thankyou so much for this, it really helped. Is there any way you could email me about a matter i would like to talk to you about?? thanks ever so much.
Great pattern! worked perfectly in thick leather
http://browse.deviantart.com/artisan/leather/?offset=72#/d5o0u73
Olá, gostei muito desse tutorial,fiquei um pouco em dúvida sobre a redução, nesse caso posso usar esse mesmo tutorial para um corset overbust?
Oh, what a lovely tutorial- so glad I found it, but I wish I’d found it years ago! :) And, English may not be your native language, but you are better spoken & more clearly understood than many professional patterns I’ve used. I imagine in your preferred language the pattern would almost draft itself… :) So many styles & fabrics dancing in my head- now I must decide which to make first.
And a quick post-script- your hair (below) rocks. Mine is also red/purple, I’ve decided it’s a favorite. Thanks again…
This is really a great tutorial, very well explained, step-by-step…congratulations and thanks so much for sharing! I will try to make this! I love sewing, I love corsets, I love DIY things n.n greetings from Perú!!!
This tutorial was extremely helpful, easy and my very first corset ever looked great! Thanks so much :)
Thank you for this. It is exactly what I needed to know. I thought in high school I’d never have need of algebra in daily life. You have just proved me wrong. I wish I’d been a better math student so this was less intimidating but I’m determined to make a block for my measurements and get passed this fear so I can go on to make many more corsets. Hopefully I will be able to get really creative.
Hello Cathrin, I am loving the tutorial, but am really stumped on the math in step 11 with the reduction. I cannot get it to compute in my mind. How did you get the three measurements of 4 cm (1.6 in), 3 cm (1.2 in), and 2 cm (0.8 in)? This does not add up to the 13 cm (5.1 in) of the reduction. I just cannot seem to get my brain to comprehend how I need to modify my measurements since these figures do not logically add up. Please help!
@ Victoria
Sorry for being a bit unclear about this. It is 4 cm on each side of the side piece (so 8 cm in total) and then 3 cm in the back and 2 cm in front. That gives you the total of 13 cm.
To get your measurements here you need to take your Hip – waist and then add your wanted waist reduction (I usually use 10 cm). Then divide that number by two.
This number that you get will be the equal to my 13cm
In the end, it is up to you how much and where you want to put the shaping, I just chose to put it mostly in the sides and back as I find the shape it gives to be nice. You can just as well put as much as much shaping in all your seams, this would give you a different shape from what my suggestion gives you.
I hop this helps to clear things out.
Yes it does. Thank you so very much! :)
I’m planning my first corset, and this is the clearest pattern drafting tutorial out there, so thank you :)
I’ve got a question, though: if I were to use a spoon busk, what kind of (if any) alterations would be needed to the pattern? Pattern drafting isn’t something I’ve done before, and I’m afraid of making logical-thinking mistakes.
Reblogged this on Ramblers and commented:
Awesome corset tutorial
I really love this tutorial, I’ve been looking for ages a good one …and i have found it. What I was wondering is for the raise on the hip, I thought it would look like a curve going upward but i saw in your finish product that there is none, So maybe i didn’t really understand chat it was, could you explain please ?
TE ADMIRO MUCHO APARTE DE SER HERMOSA ERES INTELIGENTE,SALUDOS DESDE MEXICO.
Lexi-Moriarty: The raise on the hip is quite small in both the pattern in the tutorial and also the finished corset made by that pattern, so it is almost not visible. As the corset was made for a customer that wanted a more straight bottom edge I only made a small raise on the hip to be able to get it into the tutorial in a natural way. It can be very much more dramatic if one wish it.
great thanks for this tutorial. first hard leather corset finished thanks to it ^^
You are awesome, thanks for sharing, I really needed some “tutorial for total idiots” as this one:-)
Reblogged this on Inspired by… and commented:
Very cool!
Hi, this is the first thing I’ve ever tried to make and thank you for the pattern, I’m sorry if these seem like stupid questions but the the measurements in step 2, 3 and 4 are the the half measurements? Also, I don’t understand step 5, how can you have a rectangle because my hip line is a lot longer than the other lines? Thank you
Thank you so much for sharing!
This looks fantastic – do you have any advice for using a striped fabric – I want the stripes to run up and down, is there anything I need to take particular care with?
Thanks for sharing this. This afternoon I drawed my first personal underbust corset pattern, and I think it looks great!
I wonder how I can adjust the pattern to fit for an overbust pattern? I think I need to make the block for the breast-size and adjust it for waist and hip?
After cutting out your pattern pieces do you add a seam allowance?
Muito muitoooo obrigada! vc é abençoada. que Deus te abençoe grandemente por compartilhar seus conhecimentos.
sorry i couldn`t understand the 11 step when you say :will do that this way
1,6 inches (4 cm) on each side of the side piece
1,2 inches (3 cm) in the back
0,8 inches (2 cm) in the front , what is the front? the piece that have 6cm in the top and 2,5 cm on the bottom?and what is the back?
Re: step 27 Hip curve and measurements.
Carla I am delighted to see you were still answering questions about this fabulous tutorial as of a few months ago. Would you be willing to answer one more?
In going from step 26 to step 27, we draw a curved line for the rise of the hip. But the curved line in step 27 longer than the straight line at the hip in step 26. For example, if panels 3 and 5 measure 5″ at the bottom of the block in step 26, they might measure 5.5″ each in step 27.
My abilities to visualize the geometry from 2D to 3D are poor. Does the added length of the curved measurement of the lower hip affect the ultimate lower hip measuremen? In other words, could it make the corset off 2″ in the lower hip (.5″ x 2 panels x 2 sides= 4″)?
I can see that maybe it wouldn’t make a difference as the linear lower hip measurement would still be the same… but then again????
Thank you,
Amy
You are simply amazing, this would be very helpful.
How to switch WordPress menu from right side to the left?
Thank you very much! i learned a lot form your tutorial!
Excellent instructions. Thanks so much – I made my pattern and my under-bust corset is looking fabulous.
This pattern is very useful to make a dress with good fitting.
Thank you very much, your tutorial is easy and simple, over this passed weekend I’ve made my first corset ever, I never thought that I could draft any pattern but I did it, with your help, thank you so much, you are awesome 🙏🏼🎉
Hi!
First of all, thank you vert much for this tutorial. I used it a couple of years ago ant it works great.
Now, while browsing on FB i saw a likn toward a free pattern generator, which proposes your underbust, uses your photos but i could not see any mention of you there. So here is the link : https://freesewing.org/patterns/cathrin
Thank you so much!!! I have been trying and struggling for ages to make a corset. This pattern will actually help me accomplish this!! One question. I have a slight scoliosis and I’m not sure how to draft a pattern that accommodates that. Of the rack is always crooked on me. And I was wondering if you could help?
Obrigada por sua generosidade em ensinar.Dwus abençoe grandemente sua vida e saber.